Webアプリを個人で開発してみたいけどやり方が分からず困っていませんか?
今回は、初心者の方がつまずかないように、分かりやすく、丁寧に、JavaScriptを使ったWebアプリを作るところから公開までの方法を紹介していきます。
この記事は以下のような人にオススメ!
・初心者だけどWebアプリを作ってみたい人
・Webアプリ・Webサービスに興味のある人
・JavaScriptを勉強したい人
では、Webアプリを作っていきましょう!
ルーレットWebアプリを作る
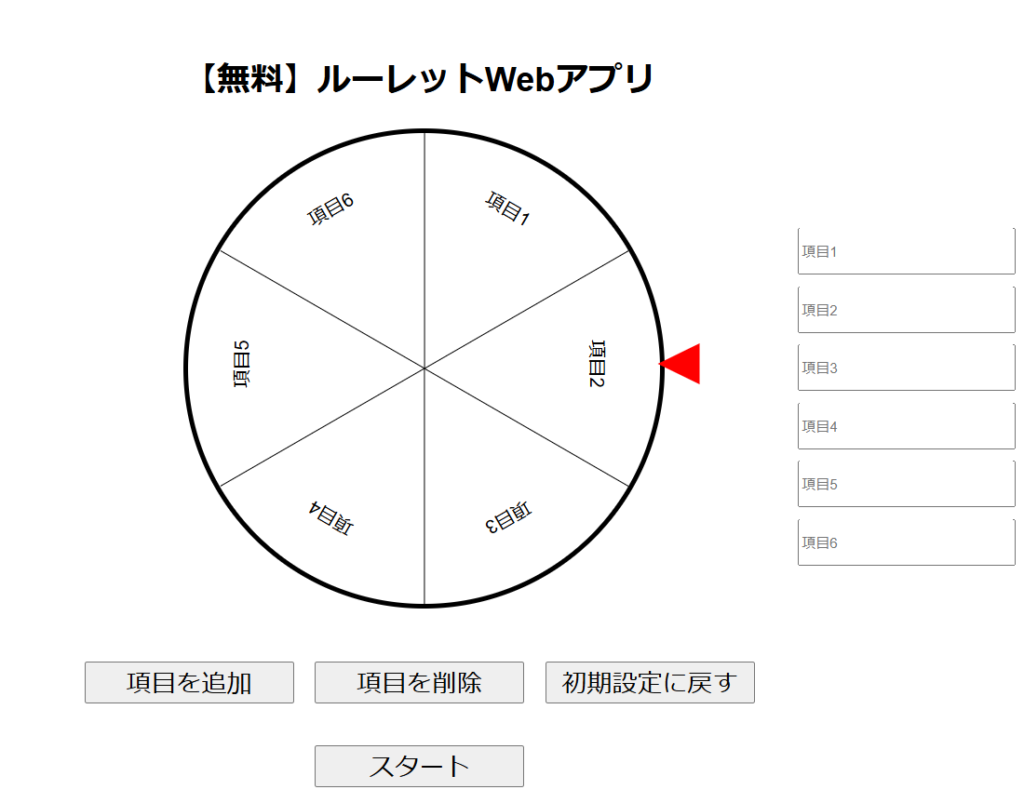
今回は、HTML、CSS、JavaScript の3つのプログラミング言語を使って「ルーレットWebアプリ」を作っていきます。
このWebアプリは、項目数を増減することができ、スタートボタンを押すとルーレットが回転して、赤い矢印で止まった項目を赤く点滅させるWebアプリとなっています。
以下が「ルーレットWebアプリ」のURLとなります。
【無料】ルーレットWebアプリ (oseroneko.com)
ぜひ、確認してどんなWebアプリを作るか把握しておきましょう!
また、インターネットでも「ルーレットWebアプリ」を公開しています。

GoogleやYahooなどで「ルーレットWebアプリ」と検索してみて下さい。
そうするといくつかのサイトが出てきますので、下にスクロールしてください。

※2024.6/15時点で上から32番目にあります。
スクロールして頂くとネコのアイコンで【無料】ルーレットWebアプリ」というのがあります。
そちらが私が作成して公開したWebアプリとなります。
みなさまも、このように1から作成~公開までできますので是非、挑戦してみて下さい!
プログラミングコードを書く

では、早速「ルーレットWebアプリ」を作っていきましょう。
まず、パソコンに備えついている「メモ帳」を開きます。
パソコン内の検索で”メモ帳”と調べれば出てくるはずです。
今回は、メモ帳にWebアプリのプログラミングコードを書いていきます。
以下が「ルーレットWebアプリ」のプログラミングコードになります。
<!DOCTYPE html>
<html lang="ja">
<head>
    <meta charset="UTF-8">
    <title>【無料】ルーレットWebアプリ</title>
    <style>
        body {
            display: flex;
            flex-direction: column;
            align-items: center;
            justify-content: center;
            height: 100vh;
            font-family: Arial, sans-serif;
        }
        .roulette-container {
            position: relative;
            width: 450px;
            height: 450px;
            margin-bottom: 20px;
        }
        .roulette {
            width: 100%;
            height: 100%;
            border: 5px solid #000;
            border-radius: 50%;
            position: relative;
        }
        .line {
            position: absolute;
            width: 1px;
            height: 225px;
            background-color: black;
            left: 50%;
            top: 50%;
            transform-origin: 0% 0%;
        }
        .text-container {
            position: absolute;
            width: 100%;
            height: 100%;
            top: 0;
            left: 0;
            transform-origin: center;
            pointer-events: none;
        }
        .text {
            position: absolute;
            font-size: 18px;
            white-space: nowrap;
            transform-origin: center;
            pointer-events: none;
        }
        .input-items {
            position: absolute;
            transform-origin: left center;
            padding-left: 20px;
            display: flex;
            flex-direction: column;
            top: 50%;
            left: 50%;
            transform: translateX(150%) translateY(-50%);
            font-size: 16px;
        }
        input {
            width: 200px;
            height: 40px;
            margin-bottom: 10px;
        }
        button {
            margin-top: 20px;
            width: 200px;
            height: 40px;
            font-size: 1.5em;
        }
        .button-row {
            display: flex;
            justify-content: center;
            gap: 20px;
            margin-top: 20px;
        }
        .arrow {
            position: absolute;
            width: 0;
            height: 0;
            border-left: 20px solid transparent;
            border-right: 20px solid transparent;
            border-bottom: 40px solid red;
            top: 50%;
            left: 105%;
            transform: translateX(-50%) translateY(-50%) rotate(270deg);
        }
        @keyframes blink {
            0%, 100% { background-color: transparent; }
            50% { background-color: red; }
        }

         @media (min-width: 600px) {
            .text {
                font-size: 18px;
            }
        }

    </style>
</head>
<body>
    <h1>【無料】ルーレットWebアプリ</h1>
    <div class="roulette-container">
        <div class="roulette" id="default-roulette"></div>
        <div class="text-container" id="text-container"></div>
        <div class="arrow"></div>
    </div>
    <div class="input-items" id="input-items">
        <!-- Input items will be dynamically added here -->
    </div>
    <input type="hidden" name="num_items" id="num_items" value="6">
    <div class="button-row">
        <button type="button" onclick="addInputItem()">項目を追加</button>
        <button type="button" onclick="removeInputItem()">項目を削除</button>
        <button type="button" onclick="resetToDefault()">初期設定に戻す</button>
    </div>
    <div class="button-row">
        <button type="button" onclick="startRoulette()">スタート</button>
    </div>
    <script>
        let numItems = 0;
        let currentRotation = 0;

        window.onload = function() {
            for (let i = 0; i < 6; i++) {
                addInputItem();
            }
        };

        // 項目を追加する関数
        function addInputItem() {
            numItems++;
            const container = document.getElementById('input-items');
            const input = document.createElement('input');
            input.type = 'text';
            input.name = 'item' + numItems;
            input.placeholder = '項目' + numItems;
            input.addEventListener('input', updateRoulette);
            input.addEventListener('keydown', function(event) {
                if (event.key === 'Enter') {
                    event.preventDefault();
                    const nextInput = input.nextElementSibling;
                    if (nextInput) {
                        nextInput.focus();
                    }
                } else if (event.key === 'Backspace' && input.value === '') {
                    event.preventDefault();
                    if (container.children.length > 1) {
                        container.removeChild(input);
                        numItems--;
                        updateRoulette();
                    }
                }
            });
            container.appendChild(input);
            updateRoulette();
        }

        // 項目を削除する関数
        function removeInputItem() {
            if (numItems > 2) {
                const container = document.getElementById('input-items');
                container.removeChild(container.lastChild);
                numItems--;
                updateRoulette();
            }
        }

        // 初期設定に戻す関数
        function resetToDefault() {
            const container = document.getElementById('input-items');
            while (container.firstChild) {
                container.removeChild(container.firstChild);
            }
            numItems = 0;
            for (let i = 0; i < 6; i++) {
                addInputItem();
            }
        }

        // ルーレットを更新する関数
        function updateRoulette() {
            const items = [];
            for (let i = 1; i <= numItems; i++) {
                items.push(document.getElementById('input-items').children[i-1].value || ('項目' + i));
            }
            document.getElementById('num_items').value = numItems;
            const container = document.getElementById('default-roulette');
            container.innerHTML = '';
            const angleIncrement = 360 / numItems;
            const radius = 225;
            const textContainer = document.getElementById('text-container');
            textContainer.innerHTML = '';

            for (let i = 0; i < numItems; i++) {
                const angle = i * angleIncrement;
                let textAngle;
                if (numItems % 2 === 0) {
                    textAngle = angle + angleIncrement / 2;
                } else {
                    textAngle = angle + angleIncrement;
                }

                const lineDiv = document.createElement('div');
                lineDiv.className = 'line';
                lineDiv.style.transform = `rotate(${angle}deg) translateX(-50%)`;
                container.appendChild(lineDiv);

                const radians = (textAngle - 90) * Math.PI / 180;
                const x = Math.cos(radians) * radius * 0.75 + radius;
                const y = Math.sin(radians) * radius * 0.75 + radius;

                const textDiv = document.createElement('div');
                textDiv.className = 'text';
                textDiv.style.left = x + 'px';
                textDiv.style.top = y + 'px';
                textDiv.style.transform = `translate(-50%, -50%) rotate(${textAngle}deg)`;
                textDiv.innerText = items[i];
                textContainer.appendChild(textDiv);
            }
        }

        // スタートボタンが押された時の処理
        function startRoulette() {
            const container = document.getElementById('default-roulette');
            const textContainer = document.getElementById('text-container');
            const randomAngle = Math.floor(Math.random() * 360) + 3600; // 3600度 (10回転) を加算して新しいランダムな角度を生成
            currentRotation += randomAngle; // 現在の回転角度に追加

            // 回転のトランジションを設定
            container.style.transition = 'transform 10s cubic-bezier(0.5, 0, 0.5, 1)';
            textContainer.style.transition = 'transform 10s cubic-bezier(0.5, 0, 0.5, 1)';
            container.style.transform = `rotate(${currentRotation}deg)`;
            textContainer.style.transform = `rotate(${currentRotation}deg)`;

            // 回転終了後に面している項目を点滅させる
            setTimeout(() => {
                const angleIncrement = 360 / numItems;
                // ルーレットの現在の角度(360度モジュロ)を計算
                const targetAngle = (currentRotation % 360);
                let selectedIndex;

                if (numItems % 2 === 0) {
                    // 偶数の場合:3時の位置に項目がくるように調整
                    selectedIndex = Math.floor((360 - targetAngle + 90) / angleIncrement) % numItems;
                } else {
                    selectedIndex = Math.floor((360 - targetAngle + 65) / angleIncrement) % numItems;
                }
                const selectedText = textContainer.children[selectedIndex];
                selectedText.style.animation = 'blink 1s step-end infinite';
                setTimeout(() => {
                    selectedText.style.animation = '';
                }, 5000); // 5秒後に点滅を停止
            }, 10000); // 10秒後に実行
        }
    </script>
</body>
</html>
※プログラミングコードの解説は、長文になるため最後に行います。今すぐ気になる方は、一番下までスクロールお願いします。
では、以上のプログラミングコードをコピーしてください。
全てのプログラミングコードを選択するときは「ctrl」+「A」で選択することができます。
そして、ご自身のメモ帳アプリにペーストをして下さい。
「ctrl」+「V」でできます。

ペーストが終わったら保存をしましょう。
保存の仕方は、①ファイル → ②名前を付けて保存

③ファイル名で「ルーレットWebアプリ」など自分が分かるように名前を付けて下さい。
④保存を押しましょう。
これで、プログラミングコード自体を保存することができました。
ですが、Webアプリを起動するには拡張子が ” html ” ではないといけません。
なので、今度は拡張子が ” html ” になるように保存します。

もう一度、②までを行い、⑤今度はファイル名に ” .html ” と付けます。
さらにファイルの種類を「すべてのファイル」にします。
そして⑥保存を押します。
これで、Webアプリを作成して保存することができました。
保存した「ルーレットWebアプリ.html」をダブルクリックするとアプリが起動するはずです。
・保存は拡張子「.txt」と「.html」の2回行う。
・「.txt」はプログラミングコード自体を保存し、修正などの時に使うため。
・「.html」はWebアプリ自体を起動するため。
Webアプリを公開する

では、今作ったWebアプリを公開していきましょう!
Webアプリを公開する方法はいくつかありますが、ここではレンタルサーバーを使って公開する方法を紹介していきます。
レンタルサーバーは有料ではありますが、セキュリティー面やWebアプリ公開までの手順が簡単なことから私は選びました。
また、他に公開する方法を記事にしていますのでこちらをご覧ください。
では私も使っている、レンタルサーバー「ConoHa WING」でWebアプリを公開する方法を紹介します。
「ConoHa WING」を始めていない方はまず、以下の記事をご覧ください。
Webアプリを公開するには、レンタルサーバー「ConoHa WING」に作成したアプリのファイルを保存する必要があります。
「ConoHa WING」にWebアプリを保存する
では、自作したWebアプリをレンタルサーバに保存していきましょう。
手順① ConoHa WINGにログイン

手順② サイト管理 → ファイルマネージャーを開く

手順③ ファイルを保存する
保存する場所は、独自ドメインにします。
私の場合は、”oseroneko.com”に「ルーレットWebアプリ.html」をドラッグ&ドロップしました。
【重要】必ず拡張子 ” .html ” のファイルを保存してください。

お疲れ様です。
これで、ルーレットWebアプリをレンタルサーバに保存することができたはずです。
ちゃんと保存されているか動作確認をしましょう。
https://皆様の独自ドメイン/ファイルの名前.htmlで検索をしてみて下さい。
作成したWebアプリが表示されたらOKです!
https://oseroneko.com/ルーレットWebアプリ.html ← 見本として私のを参考にして下さい。

これで8割ほど終わりました!
あとは、GoogleやYahooで検索したら作ったWebアプリが表示されるようにしましょう!
ネットで検索してWebアプリを表示させる
頑張って作ったWebアプリをGoogleやYahooで検索したら表示されるようにしましょう!
そのためには、GoogleにWebアプリを作ったよ!と伝えなくてはいけません。
つまり、公開したWebアプリのURLをインデックス(登録)してもらいます。
では、やっていきましょう!
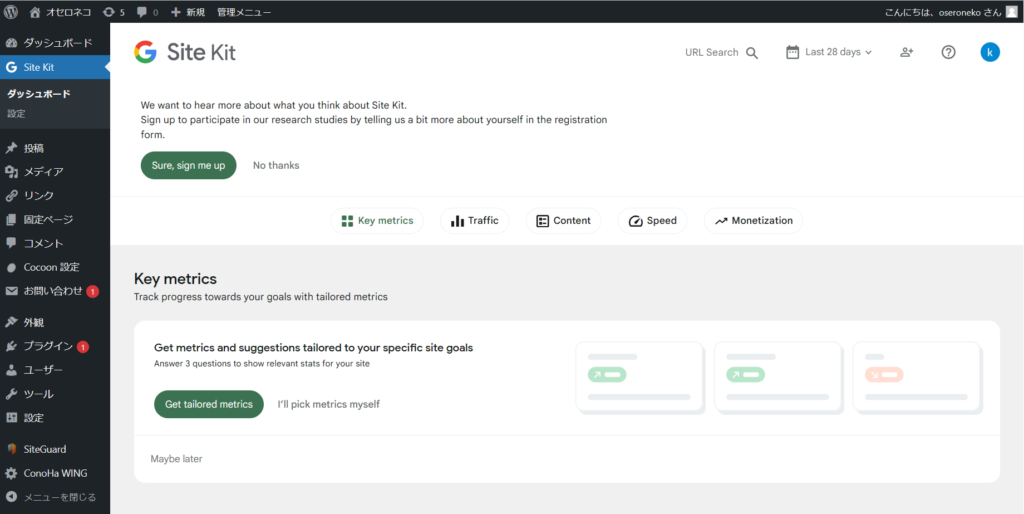
手順① Site Kit から Google Search Consoleに入ります。
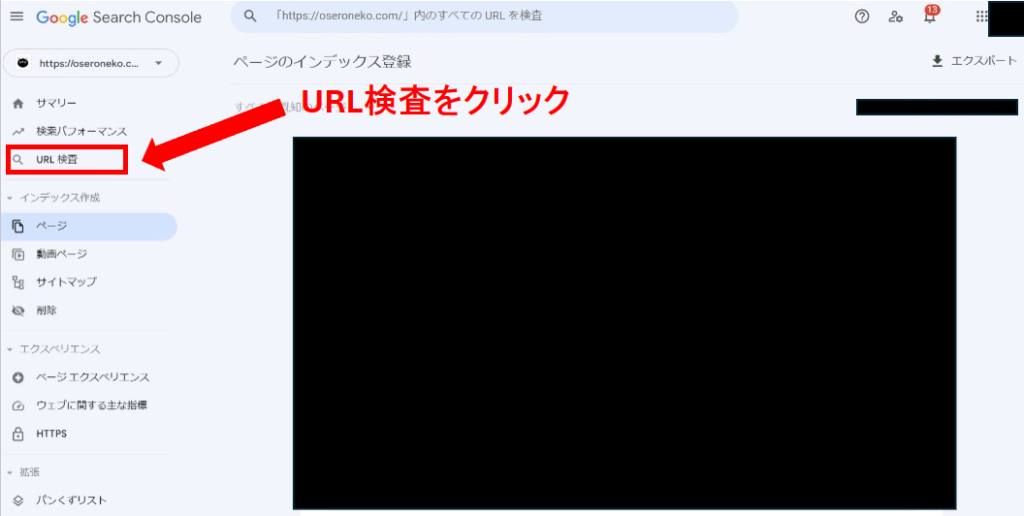
手順② URL検査をクリックして、作ったWebアプリのURLを検索する
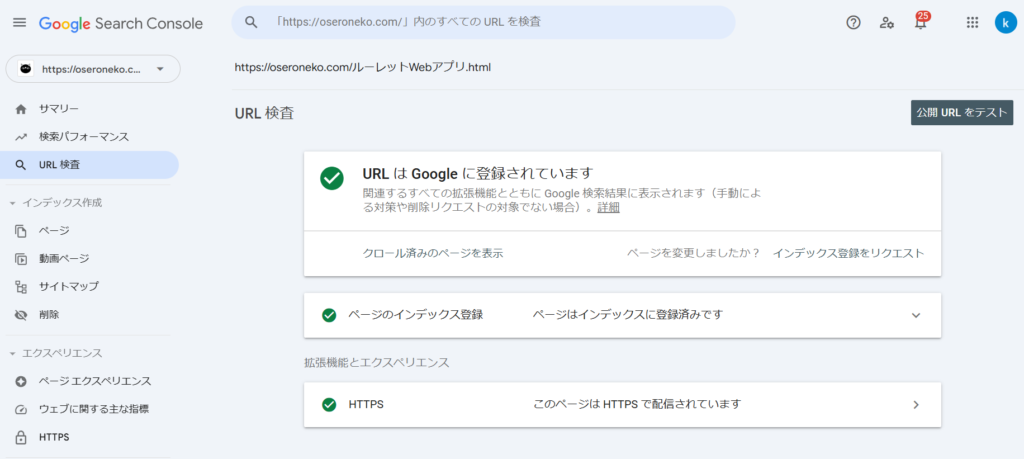
手順③ URLをリクエストして、登録する
リクエストをして、下記のように「URLはGoogleに登録されています」と表示されたらOKです!
お疲れ様です、手続きはおわりです!

登録される時間は個人差がありますが、私の場合30分ほどでできました!
Webアプリが公開されているか確認しよう!

登録されたら、Webアプリにつけたタイトル名でGoogleかYahooで検索してみてください。
表示されていれば成功です!
これで、Webアプリの作成~公開までの紹介終わりです。
最後に今回作成した「ルーレットWebアプリ」のプログラミングコードの解説です。
プログラミングコードの解説
これはHTML、CSS、JavaScriptを含んでルーレットのWebアプリを作っているコードです。各部分の役割を初心者にも分かりやすく説明していきます。
HTML部分
<!DOCTYPE html>
<html lang="ja">
<head>
    <meta charset="UTF-8">
    <title>【無料】ルーレットWebアプリ</title>
    <style>
        /* ここにCSSが入ります */
    </style>
</head>
<body>
    <h1>【無料】ルーレットWebアプリ</h1>
    <div class="roulette-container">
        <div class="roulette" id="default-roulette"></div>
        <div class="text-container" id="text-container"></div>
        <div class="arrow"></div>
    </div>
    <div class="input-items" id="input-items">
        <!-- 入力項目が動的に追加される場所 -->
    </div>
    <input type="hidden" name="num_items" id="num_items" value="6">
    <div class="button-row">
        <button type="button" onclick="addInputItem()">項目を追加</button>
        <button type="button" onclick="removeInputItem()">項目を削除</button>
        <button type="button" onclick="resetToDefault()">初期設定に戻す</button>
    </div>
    <div class="button-row">
        <button type="button" onclick="startRoulette()">スタート</button>
    </div>
    <script>
        /* ここにJavaScriptが入ります */
    </script>
</body>
</html>
説明
<!DOCTYPE html>: HTML5のドキュメントであることを宣言します。<html lang="ja">: ページの言語が日本語であることを示します。<head>: メタ情報やタイトル、CSSのスタイルシートを含むセクション。<meta charset="UTF-8">: 文字エンコーディングがUTF-8であることを示します。<title>【無料】ルーレットWebアプリ</title>: ブラウザタブに表示されるページのタイトル。<style>: CSSのスタイルシート。ページの見た目を設定します。<body>: ページの内容が含まれるセクション。<h1>【無料】ルーレットWebアプリ</h1>: ページの見出し。- ルーレットや入力項目、ボタンが配置される各種
<div>要素。 <script>: JavaScriptが含まれるセクション。
CSS部分
body {
    display: flex;
    flex-direction: column;
    align-items: center;
    justify-content: center;
    height: 100vh;
    font-family: Arial, sans-serif;
}
.roulette-container {
    position: relative;
    width: 450px;
    height: 450px;
    margin-bottom: 20px;
}
.roulette {
    width: 100%;
    height: 100%;
    border: 5px solid #000;
    border-radius: 50%;
    position: relative;
}
.line {
    position: absolute;
    width: 1px;
    height: 225px;
    background-color: black;
    left: 50%;
    top: 50%;
    transform-origin: 0% 0%;
}
.text-container {
    position: absolute;
    width: 100%;
    height: 100%;
    top: 0;
    left: 0;
    transform-origin: center;
    pointer-events: none;
}
.text {
    position: absolute;
    font-size: 18px;
    white-space: nowrap;
    transform-origin: center;
    pointer-events: none;
}
.input-items {
    position: absolute;
    transform-origin: left center;
    padding-left: 20px;
    display: flex;
    flex-direction: column;
    top: 50%;
    left: 50%;
    transform: translateX(150%) translateY(-50%);
    font-size: 16px;
}
input {
    width: 200px;
    height: 40px;
    margin-bottom: 10px;
}
button {
    margin-top: 20px;
    width: 200px;
    height: 40px;
    font-size: 1.5em;
}
.button-row {
    display: flex;
    justify-content: center;
    gap: 20px;
    margin-top: 20px;
}
.arrow {
    position: absolute;
    width: 0;
    height: 0;
    border-left: 20px solid transparent;
    border-right: 20px solid transparent;
    border-bottom: 40px solid red;
    top: 50%;
    left: 105%;
    transform: translateX(-50%) translateY(-50%) rotate(270deg);
}
@keyframes blink {
    0%, 100% { background-color: transparent; }
    50% { background-color: red; }
}
@media (min-width: 600px) {
    .text {
        font-size: 18px;
    }
}
説明
body: ページ全体のレイアウトを中央に配置し、フォントを設定します。.roulette-container: ルーレットのコンテナサイズと位置を設定します。.roulette: ルーレット自体のスタイルを設定します。.line: ルーレットの各区切り線のスタイル。.text-container: ルーレット上のテキストを配置するコンテナ。.text: ルーレット上の各テキストのスタイル。.input-items: 入力フィールドの配置とスタイル。input: 入力フィールドのサイズとマージン。button: ボタンのサイズとスタイル。.button-row: ボタンの配置。.arrow: ルーレットの矢印マーカーのスタイル。@keyframes blink: テキストの点滅アニメーション。@media: 画面幅600px以上の時のフォントサイズの調整。
JavaScript部分
let numItems = 0;
let currentRotation = 0;

window.onload = function() {
    for (let i = 0; i < 6; i++) {
        addInputItem();
    }
};

// 項目を追加する関数
function addInputItem() {
    numItems++;
    const container = document.getElementById('input-items');
    const input = document.createElement('input');
    input.type = 'text';
    input.name = 'item' + numItems;
    input.placeholder = '項目' + numItems;
    input.addEventListener('input', updateRoulette);
    input.addEventListener('keydown', function(event) {
        if (event.key === 'Enter') {
            event.preventDefault();
            const nextInput = input.nextElementSibling;
            if (nextInput) {
                nextInput.focus();
            }
        } else if (event.key === 'Backspace' && input.value === '') {
            event.preventDefault();
            if (container.children.length > 1) {
                container.removeChild(input);
                numItems--;
                updateRoulette();
            }
        }
    });
    container.appendChild(input);
    updateRoulette();
}

// 項目を削除する関数
function removeInputItem() {
    if (numItems > 2) {
        const container = document.getElementById('input-items');
        container.removeChild(container.lastChild);
        numItems--;
        updateRoulette();
    }
}

// 初期設定に戻す関数
function resetToDefault() {
    const container = document.getElementById('input-items');
    while (container.firstChild) {
        container.removeChild(container.firstChild);
    }
    numItems = 0;
    for (let i = 0; i < 6; i++) {
        addInputItem();
    }
}

// ルーレットを更新する関数
function updateRoulette() {
    const items = [];
    for (let i = 1; i <= numItems; i++) {
        items.push(document.getElementById('input-items').children[i-1].value || ('項目' + i));
    }
    document.getElementById('num_items').value = numItems;
    const container = document.getElementById('default-roulette');
    container.innerHTML = '';
    const angleIncrement = 360 / numItems;
    const radius = 225;
    const textContainer = document.getElementById('text-container');
    textContainer.innerHTML = '';

    for (let i = 0; i < numItems; i++) {
        const angle = i * angleIncrement;
        let textAngle;
        if (numItems % 2 === 0) {
            textAngle = angle + angleIncrement / 2;
        } else {
            textAngle = angle + angleIncrement;
        }

        const lineDiv = document.createElement('div');
        lineDiv.className = 'line';
        lineDiv.style.transform = `rotate(${angle}deg) translateX(-50%)`;
        container.appendChild(lineDiv);

        const radians = (textAngle - 90) * Math.PI / 180;
        const x = Math.cos(radians) * radius * 0.75 + radius;
        const y = Math.sin(radians) * radius * 0.75 + radius;

        const textDiv = document.createElement('div');
        textDiv.className = 'text';
        textDiv.style.left = x + 'px';
        textDiv.style.top = y + 'px';
        textDiv.style.transform = `translate(-50%, -50%) rotate(${textAngle}deg)`;
        textDiv.innerText = items[i];
        textContainer.appendChild(textDiv);
    }
}

// スタートボタンが押された時の処理
function startRoulette() {
    const container = document.getElementById('default-roulette');
    const textContainer = document.getElementById('text-container');
    const randomAngle = Math.floor(Math.random() * 360) + 3600; // 3600度 (10回転) を加算して新しいランダムな角度を生成
    currentRotation += randomAngle; // 現在の回転角度に追加

    // 回転のトランジションを設定
    container.style.transition = 'transform 10s cubic-bezier(0.5, 0, 0.5, 1)';
    textContainer.style.transition = 'transform 10s cubic-bezier(0.5, 0, 0.5, 1)';
    container.style.transform = `rotate(${currentRotation}deg)`;
    textContainer.style.transform = `rotate(${currentRotation}deg)`;

    // 回転終了後に面している項目を点滅させる
    setTimeout(() => {
        const angleIncrement = 360 / numItems;
        // ルーレットの現在の角度(360度モジュロ)を計算
        const targetAngle = (currentRotation % 360);
        let selectedIndex;

        if (numItems % 2 === 0) {
            // 偶数の場合:3時の位置に項目がくるように調整
            selectedIndex = Math.floor((360 - targetAngle + 90) / angleIncrement) % numItems;
        } else {
            selectedIndex = Math.floor((360 - targetAngle + 65) / angleIncrement) % numItems;
        }
        const selectedText = textContainer.children[selectedIndex];
        selectedText.style.animation = 'blink 1s step-end infinite';
        setTimeout(() => {
            selectedText.style.animation = '';
        }, 5000); // 5秒後に点滅を停止
    }, 10000); // 10秒後に実行
}
説明
let numItems = 0;: 現在の項目数を保持する変数。let currentRotation = 0;: 現在の回転角度を保持する変数。window.onload: ページが読み込まれたときに初期設定を実行するイベント。addInputItem(): 項目を追加する関数。numItems++: 項目数を増やす。- 入力フィールドを作成し、イベントリスナーを追加。
- コンテナに入力フィールドを追加し、ルーレットを更新。
removeInputItem(): 項目を削除する関数。- 最小項目数をチェックし、入力フィールドを削除。
- ルーレットを更新。
resetToDefault(): 初期設定に戻す関数。- 全入力フィールドを削除し、6個の入力フィールドを追加。
updateRoulette(): ルーレットを更新する関数。- 各入力フィールドの値を取得し、ルーレットのセクションとテキストを作成。
startRoulette(): ルーレットを開始する関数。- ランダムな角度でルーレットを回転。
- 回転終了後に選択された項目を点滅させる。
このコード全体は、ユーザーが動的に入力項目を追加・削除でき、ルーレットを回転させるシンプルなWebアプリケーションを作成しています。
これで、解説は完了です!
それではまた~✋




コメント